SWEET MEMORIES!
My favorite fragrances in the whole, wide world are the ones that take me places the moment I smell them. It can be an associated feeling with an image the aroma brings to mind, such as walking through a field of wildflowers on a warm, spring day (An “aromatic journey”, as I like to call it!), or a specific memory where I’m taken back in time; re-living the past via an “aromatic catalyst”. It’s no wonder why I’m absolutely infatuated with Nurture Soap’s “Winter Wonderland” fragrance oil! With green top notes enhanced by sparkling pineapple; middle notes of pine and warm spice, and woody base notes intertwined with revitalizing ozone and a kiss of sugary cotton candy, “Winter Wonderland” isn’t just a fabulous fragrance oil (Which can be enjoyed any time of year, by the way!), it’s also an aroma that takes me back to one of my most favorite childhood memories!
One sniff of this fragrance oil and I’m immediately taken back to a camping trip, circa 1992. The place: Big Bear, California. It’s the cold that’s woken me, and even though I’m wearing long johns and buried deep within my sleeping bag, I’m still shivering. I reach out and feel the side of the tent. It’s ice-cold to the touch and frozen with condensation. I can tell the sun hasn’t risen yet; the tent I’m sharing with my fast-asleep, big sister is shrouded in pre-dawn's silvery-blue light. The forest is uncharacteristically quiet, save for one, lone crow intermittently cawing off in the distance. In the early-morning stillness, I hear a welcoming sound coming from outside my tent. It’s the familiar popping and crackling of fire. To take advantage of the fire’s enticing warmth, I’ll have to leave the bundled cocoon of my sleeping bag and reluctantly brave the frigid morning air. The inviting sounds of the fire, and the prospect of warmth, beckon to me.
Slipping my feet into boots and velcroing my coat up to my chin, I unzip the tent and am instantly introduced to the frosty-cold bite of morning air. It’s bitterly cold, but invigorating at the same time. I’m instantly awake! The ground is covered in glistening dew, which has frosted-over during the night and won’t melt until touched by the sun’s first warm, golden rays. It blankets the ground in shimmering crystals, while all around, the air smells crisp, clean and new. Softly whistling through the tall pines in a rush of white noise, the brisk morning air nips at my cheek bones and the tip of my nose, carrying the scent of the trees with it. My dad is standing by the fire, tending something he’s made in a heavy cast-iron pot. The aroma of melting, caramelized sugar wafts this way and that, as the indecisive flames of the fire change direction. I approach and stand as close to the crackling fire as I possibly can; cozy and content to be enveloped within its generous heat while listening to my dad hum Rolling Stones songs. As the revitalizing aromas of the forest mingle with the sweet scent of upside-down cake, I eagerly wait to savor a piece!
This is the precise memory Nurture Soap’s “Winter Wonderland” fragrance oil brings to the forefront of my mind every time I smell it! I’ll never get sick of re-living this memory OR smelling this fragrance oil! For this week’s project, I wanted to incorporate “Winter Wonderland” fragrance oil into a batch of “hybrid” soap. I’ve never actually attempted making hybrid soap before, but it’s something that piqued my interest and seemed worth a try! Hybrid soap is the term for incorporating melt and pour soap into a batch of cold process soap to create a really neat effect! I’ve seen pictures of hybrid soaps made by crafters much more talented than myself, and the results were fascinating!
By swirling clear melt & pour soap base into a batch of cold process soap, I’ve seen gorgeously unique pieces of soapy art where the melt and pour soap base made it appear as if you could peer below the surface of the cold process soap... Sort of like a thin layer of ice or glass embedded into the topmost layer of the bar. In some instances, when held to the light, you could even see clear-through the soap itself in some areas! This technique seemed perfect for the frosty-sweet, forest-goodness of “Winter Wonderland” fragrance oil, and it brought to mind mental images of tree-lined coastlines jutting out beyond frigid ocean waters. I also figured a soap named “My Memory of Camping in Big Bear” was much too long, and wouldn’t make much sense to anyone but me... A soap named “Pacific Northwest” though; now that was perfect!
This technique is easy, fun, and really does produce quite a neat effect in soap, so please feel free to join me in making a batch of “Pacific Northwest” hybrid soap! As a first attempt, I was very happy with how the soaps turned out, but also learned how I’d do things differently in future batches too. Hopefully, by sharing my experience, anyone interested in giving this technique a try will benefit from the things I’d do differently and produce a batch of soap they positively love! Let’s grab some “Winter Wonderland” fragrance oil and get started!
GOING GREEN
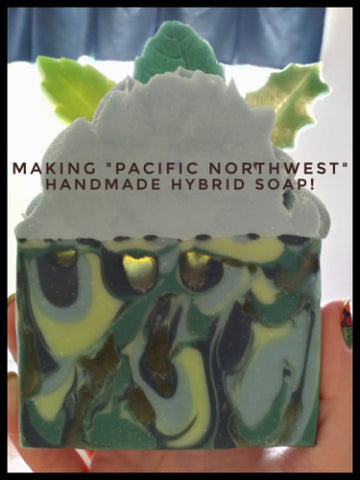
I’ve personally got a “thing” for soap frosting and piping the tops of my soap batches, but keep in mind that adding soap frosting to the top of your own batch of hybrid soap is completely optional. Soap is art, so there are literally no rules to follow when it comes to the design of this, or any, project! If you’d like to design your own batch differently, that is absolutely A-Okay! If you’d like to include the piped-top of this project, you’ll want to grab some of Nurture Soap’s Low Sweat, Clear Soap Base and some leaf embed molds. Any shape or type of leaf embed will work great since this is the Pacific Northwest we’re paying tribute to! For the specific design that I made, I grabbed three different types of leaf embed molds and went green! For my first set of soapy leaves, I used Nurture Soap’s positively regal “Savage Garden” mica. This is an exquisite shade of deep, dark, verdant green!
The second set of leaves were made with Nurture’s “Alpine Green” mica, and just as its name implies, it’s a spot-on shade of pine! This mica color is a must when it comes to all things pine-themed since it’s a stunning shade of spruce, complete with the perfect touch of dusky-blue undertones! For the third set of leaf embeds, I chose the organic, almost “Creme de Menthe”, mint-like shade of “Celadon Green” mica. These three green micas would prove to look amazing, both on top and incorporated into the soap batch itself!

For this project, I chose colors I felt would best convey the “vibe” of the great Pacific Northwest. From its vast, dense, green forests, to its rocky coastline, when I think: “Pacific Northwest”, green certainly comes to mind, but dark shades and silvery-blue hues do too! I used five colors in total for this batch, with four of them being incorporated into the cold process part of the project, and one being reserved for the melt and pour soap base. The four chosen, Pacific-inspired, cold process colors included the regal “Dark Navy Blue” mica, followed by “Baby Blue” mica, mixed 50/50 with “Winter White” mica. Next was “Celadon Green” mica, also mixed 50/50 with “Winter White” mica, and last but not least: “Savage Garden” mica, mixed equal parts with “Alpine Green” mica to produce a gorgeous shade of hunter green!

PORTIONS MAKE PERFECT
The pour of this technique is super simple, super fun and super cool to look at too! To begin, I simply divided my cold process soap batter into four equal portions, then incorporated my lovely mica colors into them. “Winter Wonderland” fragrance oil behaves so well in cold process soap, you can choose to add it to your soap batter prior to splitting it into four equal portions, or afterward; whichever you prefer! Just make sure to reserve some of the fragrance oil for your fifth portion of soap too. The fifth portion of soap is the clear melt & pour soap base, and for this project, I weighed and melted down a total of 8oz of melt & pour soap base (4oz per pound of cold process soap making oils, or “PPO”.) to be swirled into the batch. Fragrance is typically added to melt & pour soap base at a rate of 1-3%, so I reserved .25oz of “Winter Wonderland” fragrance oil (approximately 3%), and added it to my 8oz of melt & pour soap base.
As for the color of my melt & pour soap portion, I chose a mica that’s extra special to me, and one I rarely use because it was discontinued by the manufacturer. When it’s gone, it gone, and I will literally cry! That mica color is Nurture Soap’s “Belize Blue” mica, and it’s the most sensational shade of light frosted-blue with highlights of silver and undertones of gold! It’s positively magical, and if you have any “Belize Blue” mica left and feel like sharing, I make a good sharing buddy... Just saying! If you don’t have this discontinued mica on-hand though, no need to worry! You can substitute it with Nurture Soap’s exclusive “Celestial Silver” mica! “Celestial Silver” carries more periwinkle tones in comparison, but in application, both micas accomplish similar results in that you can achieve a magnificent frosty, silvery-blue-type shade in soap with either one!


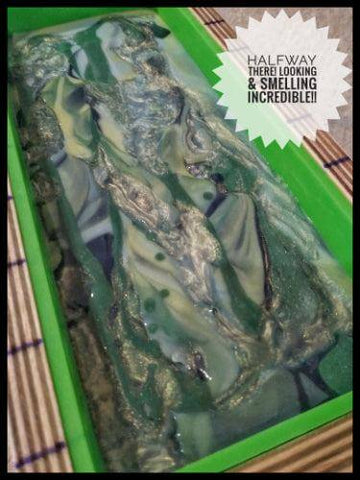
Pouring a batch of hybrid soap is as easy as pouring a drop swirl... Really, that’s all there is to it! Begin by pouring your cold process soap portions in a drop swirl, going up and down the length of your mold. When it comes time to pour the portion of melt & pour soap into the mold, just continue by pouring about a third of it in the same length-wise drop swirl design, up and down the mold. While pouring this batch, I made three drop swirl passes with the melt and pour soap base until the entire 8oz was poured into the batch.

As you pour your soap portions, you’ll notice that the melt & pour soap base will set up quickly within the cold process soap batter. This is nothing to worry about, as the cold process soap you pour over it will settle around the hardened melt & pour soap base, creating a beautiful design within the soap. If you pour your cold process soap batter from up high, it’ll help to break up and disperse the melt & pour soap throughout the batch. Pouring your cold process soap batter gently and lower will help keep the melt & pour soap intact, creating bigger sections of melt & pour soap that will enable you to see all the way through the bars when light passes through them.
This is actually one of the things I would’ve done differently with this batch. When I first started pouring the batch in a standard drop swirl, I dropped the cold process soap batter in from up high, which broke up and dispersed the melt & pour soap below it. As a result, I got some pretty neat-looking swirls of melt & pour soap throughout the bars, but it prevented the melt & pour soap from being seen all the way through the cut bars when light passed through them.
As I neared the end of pour, I began pouring my cold process soap batter more gently, and from a much lower height, which kept the melt & pour soap intact. This is why only the very top areas of my soap bars have sections of melt & pour soap which can be seen all the way through the bar when held up to the light. Don’t get me wrong, the bottom areas of the bars have a really neat effect too, appearing transparent and glass-like on the surface of my soaps, but if you’re wishing to create melt & pour sections within your soap batch, where light is able to pass through both sides of the bars, pouring your cold process soap batter over the melt & pour soap gently, and from down low (so as to not disrupt or disperse the melt & pour soap throughout the batch) is the best way to achieve that. In any case, no matter how you prefer to drop swirl your cold process soap batter over the melt & pour soap, you’ll be wowed by just how pretty your batch looks!

As I finished up the very last of my pour, I made sure to include the entirety of my 8oz portion of melt & pour soap, then topped it off with as much cold process soap batter as I could possibly fit in the mold. Pouring the batch itself was a beautiful experience from start to finish! “Winter Wonderland” fragrance oil behaved as wondrously as its name, and my whole kitchen smelled like the heavenly, great outdoors! With the main batch finished up, it was time to blend up some soap frosting and get the top of the loaf piped!

Only one last thing remained before moving on to the soap frosting part of this project. Without really thinking this one completely through, I had made my standard cold process batch-size to fill Nurture Soap’s 2.5LB Basic Loaf Mold, but didn’t take into account the fact that 8oz of my cold process soap batter was to be substituted with melt & pour soap base. This left me with a good amount of remaining cold process soap batter, and I’ve always been of the mindset to leave no drop of soap behind! The solution: I grabbed one of my 1LB test-batch molds and added my leftover soap to it. The mini-sized bars of soap this produces when cut really come in handy! If you find yourself with an excess amount of leftover soap batter, put it to good use! Mini-sized soaps make for excellent travel-sized bars, hand soaps for your kitchen and/or bathroom sinks, free samples to gift to customers, donations to shelters, gifts for friends and/or family who run their own Air BnB, soap cubes or shavings for future projects, guest soaps, gift basket decorations, and much more!

PIPING & THE PACIFIC!
With the pour complete, it’s time to finish up this batch of hybrid soap by adding soap frosting and decorative leaf embeds to the very top of the loaf! Keep in mind though that in NO WAY is omitting the piped-top portion of this project going to make or break how amazing your batch of hybrid soap is going to turn out! Feel free to skip this section entirely if you prefer a batch of soap sans piped-top! There’s no right or wrong way to express your artistic talent!
For those who would like to include the soap frosting and decorative embeds, now’s the time to whip up a batch of creamy soap frosting, and if you’d like, you can do so using my favorite soap frosting recipe I’ve included below! For the soap frosting color, once again I chose the serene color combination of Nurture Soap’s stormy-blue “Baby Blue” mica, mixed with “Winter White” mica at 1-part “Baby Blue” to 2 parts “Winter White”, and used an ATECO Open-Star piping tip. Once finished, a healthy dusting of Nurture’s jaw dropping “Snowflake Sparkle” mica made the soap shimmer like freshly-fallen snow, and the lush, green leaf embeds completed the project’s outdoorsy theme beautifully!

All-in-all, I was very pleased with how my first batch of hybrid soap turned out, and having this experience under my belt was a great learning opportunity too! For starters, I learned exactly what the differences are between pouring my cold process soap batter from up high, and pouring it gently from down low. As already mentioned, both ways produce an entirely different look, with each unique look creating a different effect in the finished soap. Perhaps it would be even more helpful to wait a little longer between pouring the melt and pour soap and pouring the next portion of cold process soap over it. Since the melt and pour soap hardens rather quickly once poured, giving it a few extra seconds to harden up a little more might make a big difference! There’s definitely no “right” or “wrong” way to make a batch of hybrid soap, and no matter how you go about pouring your drop swirl, I think you’re really going to love the results either way! Try pouring a batch of hybrid soap from up high, and another from down low to see which look you like best!
Another learning opportunity (That I can only make speculations about at this point!) happened when I cut the batch and discovered that my “Belize Blue” melt and pour soap changed into a very pretty (And luckily, very apt!) shade of dark, olive-toned green! I really don’t have a definitive answer as to how or why this happened, but I rather like it! It’s possible that the other mica colors used in this project were just a bit too dark for the lightness of “Belize Blue” mica to stand out against them, or that it really DID change in color. In any case, it gets the wheels turning in my head, and makes me wonder if it’s better to use dark mica colors in the melt & pour soap base for this project. It also makes me curious to try other batches of hybrid soap, using an all-white “background”, as well as an all-black one, to see how those might affect the colors and appearance of the micas used to color the melt & pour soap base. With all this motivation to experiment and improve, I might just have to revisit this technique & topic in a future blog. For the time being though, I’m thoroughly enjoying the “artistic ride”, and in sharing this with you, my fellow crafty companions, I truly hope you do too!


MAIN BATCH RECIPE:
- Sodium Hydroxide@ 5% Superfat
- Liquid/Distilled Water @ 33% Lye Concentration (2:1/Liquid: Lye)
- 38% Olive Oil
- 28% RSPO Palm Oil OR RSPO Palm Shortening (AKA: “No-Stir Palm”)
- 27% Coconut Oil
- 7% Castor Oil
- 4oz/PPO Low Sweat Clear Soap Base
- 3% “Winter Wonderland” Fragrance Oil (*Incorporated into Low Sweat Clear Soap Base Portion)
- 6% “Winter Wonderland” Fragrance Oil (*Incorporated into Cold Process Soap Portion)
- Micas for Cold Process Soap Portion @ 1tsp/PPO: “Dark Navy Blue” Mica, Equal Parts “Baby Blue” + “Winter White” Micas, Equal Parts “Savage Garden” + “Alpine Green” Micas, Equal Parts “Celadon Green” + “Winter White” Micas
- Mica for Low Sweat Clear Soap Base Portion @ ¼ - ½ tsp Per Pound of Soap Base: “Belize Blue” Mica (DISCONTINUED) OR “Celestial Silver” Mica
SOAP FROSTING RECIPE:
- Sodium Hydroxide @ 5% Superfat
- Liquid/Distilled Water @ 33% Lye Concentration (2:1/Liquid: Lye)
- 35% Olive Oil
- 28% RSPO Palm Shortening (AKA: “No-Stir Palm”)
- 27% Coconut Oil
- 10% Castor Oil
- Mica @ 1tsp/PPO: 2 Parts “Winter White” Mica + 1-Part “Baby Blue” Mica
- Melt & Pour Leaf Embeds in “Savage Garden” Mica
- Melt & Pour Leaf Embeds in “Alpine Green” Mica
- Melt & Pour Leaf Embeds in “Celadon Green Mica”
- “Snowflake Sparkle” Mica (*Dusted on Top)
- ATECO #826 Open Star Piping Tip